Companion Guide: Building a Secure Video Pipeline From Scratch
A Hands-On Companion Guide to the Qencode × DoveRunner Webinar
1. Introduction
This guide is a hands-on companion to the “Building a Secure Video Pipeline From Scratch” webinar presented jointly by Qencode and DoveRunner. By the end of it, you will have built a working video pipeline with two layers of content protection:
- DRM encryption using DoveRunner Multi-DRM and Qencode transcoding, which prevents unauthorized playback of your content.
- Forensic watermarking using DoveRunner A/B watermarking and Qencode encoding, which lets you trace the source of a leak if protected content is ever redistributed.
The guide follows a build-then-verify cadence. Each major stage ends with a concrete validation step so you can confirm your pipeline works before moving on. You do not need to rewatch the webinar to follow along, everything you need is here and in the linked documentation.
2. Prerequisites & Credentials Checklist
Gather everything below before starting. Later sections refer back to this checklist rather than repeating it.
Qencode
| Item | Where to find it |
| Project API key | Qencode dashboard → Projects |
| Destination storage credentials | Your S3-compatible bucket’s key and secret |
Every Qencode API interaction begins with exchanging your project API key for a session token via the /v1/access_token endpoint. This is your first API call in any Qencode workflow, do not skip it.
DoveRunner – DRM
| Item | Where to find it |
| Site ID | DoveRunner Console → Multi-DRM → DRM Setting |
| Site Key | DoveRunner Console → Multi-DRM → DRM Setting |
| Access Key | DoveRunner Console → Multi-DRM → DRM Setting |
| KMS Token | DoveRunner Console → Multi-DRM → DRM Setting |
DoveRunner — Forensic Watermarking
| Item | Where to find it |
Watermark Key (doverunner_wm_key) | Provided by DoveRunner (base64-encoded key file) |
Access Key (doverunner_access_key) | Provided by DoveRunner (authorization string) |
These are separate credentials from the DRM set above. Contact the DoveRunner helpdesk or visit doverunner.com if you do not yet have commercial watermarking credentials.
Environment
- Python 3.8+
pip install python-pallycon(DoveRunner license token SDK)- Qencode Python 3 SDK installed
- A test video file or publicly accessible video URL that Qencode can download
3. Architecture Overview
Before writing any code, it helps to understand how the pieces fit together. The DoveRunner + Qencode pipeline forms a closed loop with five main stages:
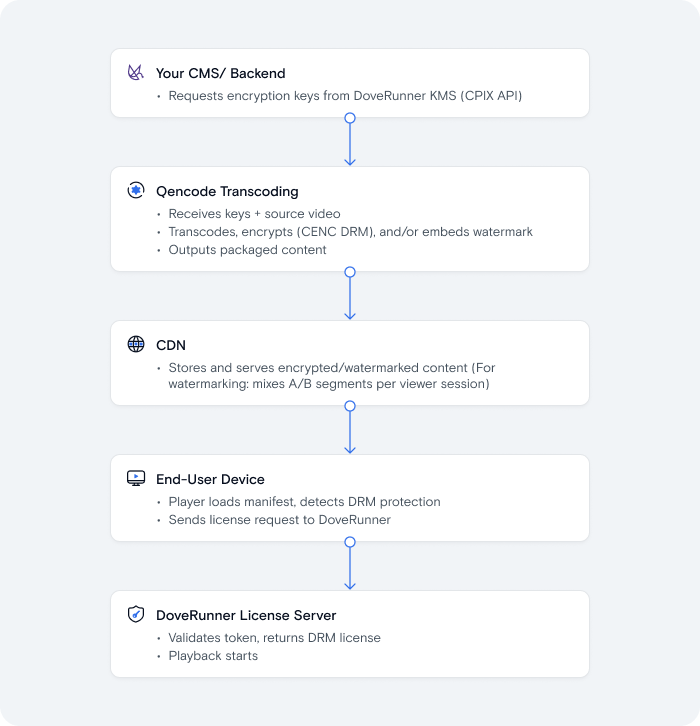
The system is closed and self-reinforcing: because DoveRunner generated the original encryption keys in step ①, it already knows the encryption details when it issues the license in step ⑤. No separate key synchronization is required.
Broader capabilities enabled by this pipeline
Once this pipeline is in place, the DoveRunner platform exposes several additional capabilities that operate on data the system is already collecting:
- Concurrent stream limiting: restrict how many simultaneous streams a user or device can run.
- Real-time analytics and blacklisting: monitor DRM request logs, identify devices and users, and blacklist bad actors.
- PiracyGuard: an existing AI/ML anomaly detection product that analyzes DRM request patterns to identify suspicious behavior across large user bases. It requires no separate implementation; it operates on the request log data your DRM integration is already producing.
These features are available to explore once the core pipeline is operational. This guide focuses on building the core pipeline itself.
4. Part One: Multi-DRM Encryption Pipeline
This section walks through building a DRM-protected video pipeline step by step: obtaining encryption keys, transcoding with encryption, generating license tokens, and verifying playback.
Step 0: Obtain a Qencode Session Token
Every Qencode API call requires a session token. Exchange your project API key for one before proceeding:
curl -X POST "https://api.qencode.com/v1/access_token" \ -d "api_key=YOUR_QENCODE_PROJECT_API_KEY"
The response includes an token field. Use this token for all subsequent Qencode API calls. Session tokens are short-lived, request a new one if yours expires.
Step 1: Obtain Encryption Keys from DoveRunner (CPIX)
DoveRunner provides a CPIX API for exchanging encryption keys with third-party encoders. You send a CPIX XML request with your content ID and the DRM system you need, and DoveRunner returns the encryption material.
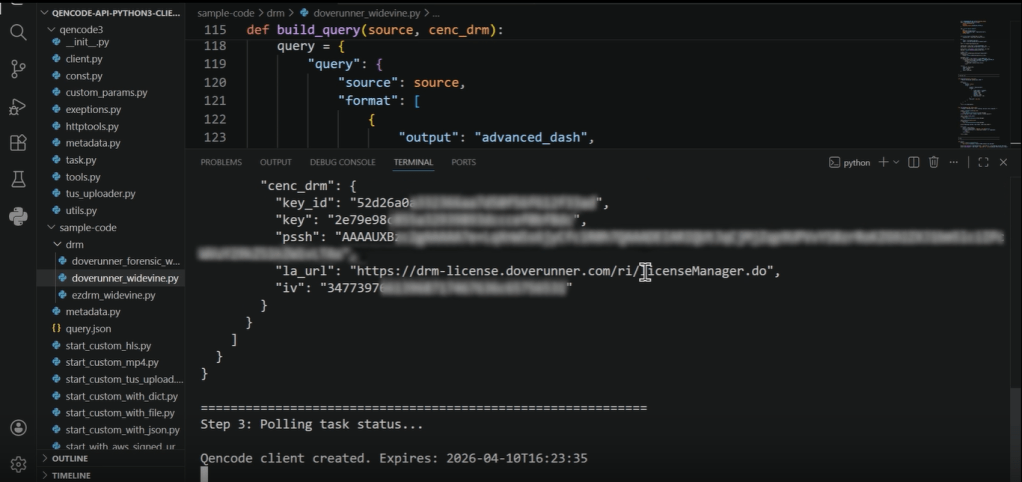
Endpoint:
POST https://drm-kms.doverunner.com/v2/cpix/doverunner/getKey/{kms-token}
Request:
curl -X POST \ "https://drm-kms.doverunner.com/v2/cpix/doverunner/getKey/YOUR_KMS_TOKEN" \ -H "Content-Type: application/xml" \ -d '<?xml version="1.0" encoding="UTF-8"?><cpix:CPIX id="YOUR_CONTENT_ID" xmlns:cpix="urn:dashif:org:cpix" xmlns:pskc="urn:ietf:params:xml:ns:keyprov:pskc" xmlns:speke="urn:aws:amazon:com:speke"> <cpix:ContentKeyList> <cpix:ContentKey kid="KID_AS_UUID"/> </cpix:ContentKeyList> <cpix:DRMSystemList> <cpix:DRMSystem kid="KID_AS_UUID" systemId="edef8ba9-79d6-4ace-a3c8-27dcd51d21ed"/> </cpix:DRMSystemList></cpix:CPIX>'
Key details about the request:
- The
idattribute on the root<cpix:CPIX>element is your content ID. Choose a meaningful, stable identifier, you will need this exact value again when generating license tokens. - The
kidattribute can be any UUID you generate. - The
systemIdvalueedef8ba9-79d6-4ace-a3c8-27dcd51d21edspecifies Widevine. For other DRM systems, see the note at the end of this section.
Response:
DoveRunner returns a CPIX XML document containing the encryption material:
<?xml version="1.0" ?><cpix:CPIX id="your-content-id" ...> <cpix:ContentKeyList> <cpix:ContentKey commonEncryptionScheme="cenc" explicitIV="NHc5dmE5aHF0Z2NsZXVlMQ==" kid="e2b281ba-fba5-8760-cfa6-5ae6f3ddd630"> <cpix:Data> <pskc:Secret> <pskc:PlainValue>xgjCQm5OdSC4tQ8Lgl9uUg==</pskc:PlainValue> </pskc:Secret> </cpix:Data> </cpix:ContentKey> </cpix:ContentKeyList> <cpix:DRMSystemList> <cpix:DRMSystem kid="e2b281ba-fba5-8760-cfa6-5ae6f3ddd630" systemId="edef8ba9-79d6-4ace-a3c8-27dcd51d21ed"> <cpix:PSSH>AAAAUXBzc2gAAAAA7e...base64-string...</cpix:PSSH> </cpix:DRMSystem> </cpix:DRMSystemList></cpix:CPIX>
Extracting and Converting Values:
This is the step where implementations most commonly break. You need to extract four values from the CPIX response and convert three of them for use in the Qencode job.
Worked example using the response above:
| Value | Source in CPIX | Conversion | Result |
key_id | kid attribute: e2b281ba-fba5-8760-cfa6-5ae6f3ddd630 | Remove dashes | e2b281bafba58760cfa65ae6f3ddd630 |
key | pskc:PlainValue: xgjCQm5OdSC4tQ8Lgl9uUg== | Base64 → bytes → hex | c608c2426e4e7520b8b50f0b825f6e52 |
iv | explicitIV: NHc5dmE5aHF0Z2NsZXVlMQ== | Base64 → bytes → hex | 34773976613968717467636c65756531 |
pssh | cpix:PSSH content | Use as-is (already base64) | AAAAUXBzc2gAAAAA7e... |
Python conversion helper:
import base64# key: base64 → hexkey_b64 = "xgjCQm5OdSC4tQ8Lgl9uUg=="key_hex = base64.b64decode(key_b64).hex()# Result: c608c2426e4e7520b8b50f0b825f6e52# iv: base64 → hexiv_b64 = "NHc5dmE5aHF0Z2NsZXVlMQ=="iv_hex = base64.b64decode(iv_b64).hex()# Result: 34773976613968717467636c65756531# key_id: just strip the dasheskid = "e2b281ba-fba5-8760-cfa6-5ae6f3ddd630"key_id = kid.replace("-", "")# Result: e2b281bafba58760cfa65ae6f3ddd630
Diagnostic tip: If your hex output is a different length than expected (32 hex characters for a 16-byte key), double-check that you’re decoding the correct base64 string and not accidentally including surrounding whitespace.
Step 2: Launch a Qencode Transcoding Job with CENC DRM
With the encryption material extracted, you can now launch a Qencode transcoding job that packages the video in DASH format with CENC encryption.

Qencode job JSON:
{ "query": { "source": "https://example.com/source.mp4", "format": [ { "output": "advanced_dash", "destination": { "url": "s3://YOUR_BUCKET/path/to/output/", "key": "YOUR_STORAGE_KEY", "secret": "YOUR_STORAGE_SECRET" }, "stream": [ { "video_codec": "libx264", "audio_codec": "aac", "width": 1280, "height": 720, "bitrate": 3000, "audio_bitrate": 128 } ], "cenc_drm": { "key_id": "e2b281bafba58760cfa65ae6f3ddd630", "key": "c608c2426e4e7520b8b50f0b825f6e52", "iv": "34773976613968717467636c65756531", "pssh": "AAAAUXBzc2gAAAAA7e+LqXnWSs6jyCfc1R0h7QAAADEIARIQ4rKBuvulh2DPplrm893WMBoKZG92ZXJ1bm5lciIPdGVzdC1jb250ZW50LTAx", "la_url": "https://drm-license.doverunner.com/ri/licenseManager.do" } } ] }}
cenc_drm parameter reference:
| Parameter | Required | Description |
key_id | Yes | The kid from the CPIX response, hex-encoded without dashes. |
key | Yes | The content key from the CPIX response, decoded from base64 to hex. |
iv | Conditional | The explicitIV from the CPIX response, decoded from base64 to hex. Include it if the CPIX response contains it. |
pssh | Yes | The Widevine PSSH from the CPIX response, base64-encoded as-is. |
la_url | Optional | DoveRunner license server URL. Including it here embeds it in the DASH manifest, which simplifies player configuration. DoveRunner uses the same URL for both Widevine and PlayReady: https://drm-license.doverunner.com/ri/licenseManager.do |
Submit this job using your Qencode session token. Monitor the job status until it completes. The output will be an encrypted DASH manifest (.mpd) at your specified destination.
Step 3: Generate a DoveRunner License Token (Server-Side)
Before a viewer can play the encrypted content, your backend must generate a DoveRunner license token that authorizes decryption.
Security requirement: This code runs on your server only. The
site_keyandaccess_keymust never be exposed to client-side code, mobile apps, or browser JavaScript.
Python example using the python-pallycon SDK:
from pallycon import PallyConClientclient = PallyConClient( site_id="YOUR_SITE_ID", site_key="YOUR_SITE_KEY", access_key="YOUR_ACCESS_KEY", drm_type=PallyConClient.DrmType.WIDEVINE.value, user_id="viewer-123", content_id="your-content-id", license_rule={ "policy_version": 2, "playback_policy": { "persistent": False, "license_duration": 3600 } },)license_token = client.license_tokenprint(license_token)
Critical: The
content_idhere must exactly match the content ID you used in the CPIX request in Step 1 (theidattribute on the root<cpix:CPIX>element). A mismatch is the single most common cause of playback failure.
Key constraints:
- License tokens are valid for 10 minutes from the timestamp of generation. Generate a fresh token for each playback session.
- Do not cache or reuse tokens across sessions.
Recommended backend pattern:
Expose an endpoint like:
GET /api/drm/token?content_id=your-YOUR_CONTENT_ID
This endpoint should:
- Authenticate the viewer (validate session or JWT).
- Check entitlement (is this user allowed to view this content?).
- Generate and return the license token string.
Step 4: Configure Playback and Verify
You now have everything needed for playback: an encrypted DASH manifest, a DoveRunner license server URL, and a freshly generated license token.
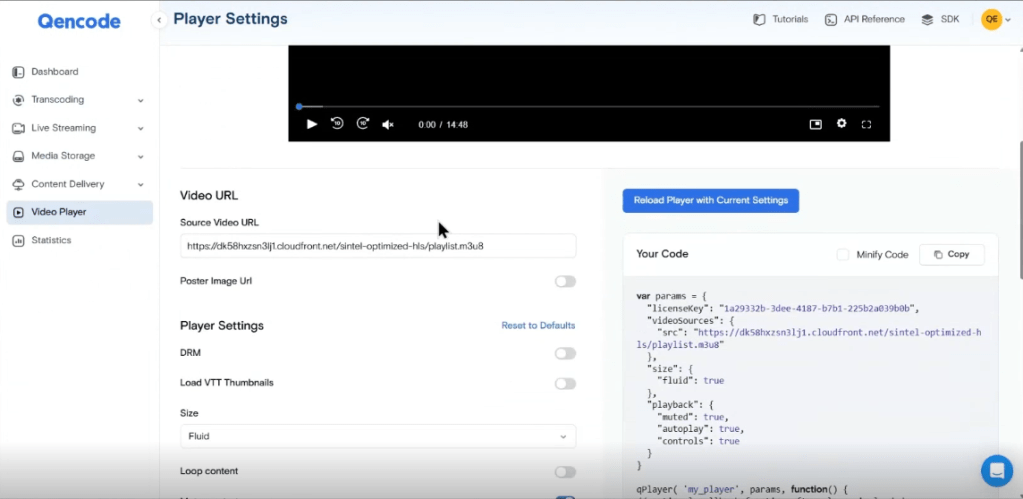
Qencode Player configuration:
var params = { licenseKey: "YOUR_QENCODE_PLAYER_LICENSE_KEY", videoSources: { src: "https://your-cdn.com/content/playlist.mpd", keySystems: { "com.widevine.alpha": "https://drm-license.doverunner.com/ri/licenseManager.do" }, emeHeaders: { "pallycon-customdata-v2": "YOUR_LICENSE_TOKEN" } }};qPlayer('my_player', params, function() { console.log("Player is loaded");});
The license token is sent as a custom HTTP header (pallycon-customdata-v2) with every license request the player makes to DoveRunner.
What happens during playback:
- The player loads the
.mpdmanifest and discovers encrypted segments. - The player detects the PSSH (DRM initialization data) embedded in the manifest.
- The player sends a license request to the DoveRunner license server, including the
pallycon-customdata-v2header. - DoveRunner validates the token, confirms the content ID matches, and returns a decryption license.
- Playback starts.
Verification. Before moving on, confirm the pipeline works end-to-end:
- Open the Qencode portal player (available in the Qencode dashboard under your project).
- Paste your DASH manifest URL (the
.mpdoutput from Step 2). - Enable DRM and set the Widevine license URL to
https://drm-license.doverunner.com/ri/licenseManager.do. - Add the custom header: name
pallycon-customdata-v2, value set to a freshly generated license token from Step 3. - Press play. If the video plays back, your DRM pipeline is working correctly.
If playback fails, see Section 8 (Troubleshooting) before proceeding.
Note: DRM Systems Beyond Widevine
The examples in this guide use Widevine because it is the most common starting point and covers Chrome, Android, and most smart TVs. However, DoveRunner supports multiple DRM systems:
| DRM System | Typical Use | Packaging Format |
| Widevine | Chrome, Android, smart TVs | DASH |
| FairPlay | Safari, iOS, Apple TV | HLS |
| PlayReady | Edge, Windows, Xbox | DASH |
| Wiseplay | Huawei devices | DASH |
For other DRM systems, the CPIX request’s systemId changes (refer to DoveRunner’s CPIX documentation for the correct UUIDs), and the packaging format may differ. Notably, FairPlay requires HLS rather than DASH, this becomes important when combining DRM with forensic watermarking in Section 6.
DoveRunner uses the same license server URL for both Widevine and PlayReady: https://drm-license.doverunner.com/ri/licenseManager.do.
5. Part Two: Forensic Watermarking Pipeline
DRM controls who can play your content. Forensic watermarking answers a different question: if content is leaked despite DRM protection, who was the source?
How A/B Watermarking Works
DoveRunner forensic watermarking embeds an invisible, imperceptible identifier directly into the video frames. The system operates in three phases:
- Preprocessing (encoding time, handled by Qencode). The source video is encoded twice: once with watermark symbol
0(variant A) and once with symbol1(variant B). Each variant has a different invisible pattern baked into every frame. Both variants are complete, independent HLS outputs stored in separate directories. - Embedding (playback time, handled by your CDN). When a viewer starts a session, a CDN-side session manager converts a unique viewer identifier into a binary sequence and selects segments from variant A or B accordingly. The viewer receives a stream that is a unique mix of A and B segments, a binary fingerprint tied to their session.
- Detection (if content leaks, handled by DoveRunner). A leaked video is submitted to the DoveRunner detection API, which analyzes the frames, recovers the A/B pattern, and maps it back to the original viewer session.
Why this design matters for implementation:
- Client-agnostic. The watermark is applied server-side during encoding and mixed at the CDN edge. There is no per-device integration work. Browsers, mobile apps, tablets, and smart TVs all receive the watermark without any client-side changes.
- Robust. The watermark survives re-encoding, cropping, scaling, screen recording, and analog capture. DoveRunner’s implementation has cleared 155 attack-scenario tests in the FormCom (Cartesian) audit.
- Fast traceability. When a leak is detected, upload the content to DoveRunner’s SaaS detection platform. Session information and viewer identification are extracted within minutes.
Step 1: Create a Qencode Job with Forensic Watermarking
Add a forensic_watermark object inside your advanced_hls format item with the two DoveRunner watermarking credentials:
{ "query": { "source": "https://example.com/input.mp4", "encoder_version": 2, "format": [ { "output": "advanced_hls", "forensic_watermark": { "doverunner_wm_key": "YOUR_DOVERUNNER_WM_KEY", "doverunner_access_key": "YOUR_DOVERUNNER_ACCESS_KEY" }, "stream": [ { "size": "1920x1080", "bitrate": "5000" }, { "size": "1280x720", "bitrate": "2500" } ], "destination": { "url": "s3://your-bucket/output/path/", "key": "your-s3-key", "secret": "your-s3-secret" } } ] }}
forensic_watermark parameters:
| Parameter | Type | Required | Description |
doverunner_wm_key | string | Yes | Base64-encoded watermark key provided by DoveRunner. Used by the watermark filter to embed the invisible pattern. |
doverunner_access_key | string | Yes | Access key string provided by DoveRunner. Authorizes the use of the forensic watermarking service. |
Hard constraints so your job will fail if any of these are violated:
- Must use
"encoder_version": 2. The v1 encoder does not support forensic watermarking and will return a validation error. - Must use
"output": "advanced_hls". Forensic watermarking is only supported with HLS output. - Currently supports H.264 (
libx264) video codec only. - GOP structure is automatically enforced (2-second closed GOPs with
scenecut=0) to ensure segment-level A/B compatibility. You do not need to configure this manually.
Step 2: Understand and Verify the Output
When the job completes, the system produces two complete HLS outputs under your destination path:
output/path/ 0/ ← variant A (symbol=0) playlist.m3u8 video_0/ chunklist.m3u8 segment-0.ts segment-1.ts ... audio_0/ chunklist.m3u8 segment-0.ts ... 1/ ← variant B (symbol=1) playlist.m3u8 video_0/ chunklist.m3u8 segment-0.ts segment-1.ts ... audio_0/ chunklist.m3u8 segment-0.ts ...
Both variants share the same segment structure and timing. This is what allows the CDN embedder to freely mix segments from /0/ and /1/ on a per-segment basis during playback.
Identifying variants in job status.
Each output in the Qencode job status response includes a wm_symbol field in its meta object:
{ "videos": [ { "tag": "video-0-0-0", "url": "https://storage.example.com/0/.../playlist.m3u8", "meta": { "width": 1920, "height": 1080, "wm_symbol": 0 } }, { "tag": "video-0-0-1", "url": "https://storage.example.com/0/.../playlist.m3u8", "meta": { "width": 1280, "height": 720, "wm_symbol": 0 } }, { "tag": "video-1-0-0", "url": "https://storage.example.com/1/.../playlist.m3u8", "meta": { "width": 1920, "height": 1080, "wm_symbol": 1 } }, { "tag": "video-1-0-1", "url": "https://storage.example.com/1/.../playlist.m3u8", "meta": { "width": 1280, "height": 720, "wm_symbol": 1 } } ]}
Verification
- Confirm both
/0/and/1/directories exist in your storage destination. - Play back both variants independently, they should look identical. The watermark is invisible to the human eye.
- Check the
wm_symbolvalues in the job status response to confirm both variants (0and1) are present across all stream profiles.
Note on trial credentials: If you are using DoveRunner trial credentials, a visible watermark overlay will appear on both variants. This is a trial limitation only and will not be present with production credentials.
Step 3: Playback-Time Embedding and Detection
Qencode handles preprocessing only (Phase 1). The remaining two phases are handled by separate integrations:
Embedding (Phase 2 — your CDN integration):
When a viewer initiates playback, your session manager generates a unique binary sequence for that viewer and directs the CDN to mix segments from variant A and variant B according to that pattern. The viewer receives a stream with a unique fingerprint. Refer to the DoveRunner Watermark Embedding Guide for CDN-side session mixing implementation details.
Detection (Phase 3 — DoveRunner service):
If content is ever leaked, upload the recorded content to the DoveRunner detection platform or use the DoveRunner Detection API. The service analyzes the video frames, recovers the A/B mixing pattern, and identifies the exact viewer session that was the source.
Cost Considerations
Forensic watermarking doubles the encoding work, since the source video is encoded twice (once per symbol variant). Both variants are processed in parallel on separate encoder instances. Qencode billing is based on actual encoding minutes consumed, so plan for approximately 2× the encoding cost for watermarked content compared to standard transcoding. Factor this into your production budgeting alongside storage costs for maintaining both variants.
6. Combining DRM and Forensic Watermarking
DRM and forensic watermarking serve complementary roles: DRM locks the front door by preventing unauthorized playback. Forensic watermarking acts as the security camera, identifying the source when someone bypasses DRM through screen recording, analog capture, or other methods. A production pipeline benefits from both.
The Format Consideration
There is a practical tension to resolve when combining these features:
- The DRM example in this guide uses
advanced_dash(DASH + Widevine). - Forensic watermarking requires
advanced_hls.
These are different output formats, which means a single Qencode job as written above cannot simply include both cenc_drm and forensic_watermark in one format item. There are several approaches to address this:
- Option A: HLS with FairPlay DRM. Since forensic watermarking requires HLS, using FairPlay DRM (which is natively HLS) aligns both features on the same output format. This is ideal for Apple-ecosystem delivery.
- Option B: Separate outputs. Run two output formats in your pipeline
advanced_hlswith forensic watermarking for leak tracing, andadvanced_dashwith CENC DRM for Widevine/PlayReady playback. Your CDN and player logic select the appropriate stream based on device. - Option C: HLS with Widevine. Some player and CDN configurations support Widevine over HLS (using
EXT-X-KEYwith SAMPLE-AES-CTR). Verify compatibility with your target devices before relying on this approach.
Recommendation: Consult Qencode’s documentation or support to confirm whether a single job can combine
cenc_drmandforensic_watermarkparameters within one HLS format item, or whether separate jobs are required. The answer may depend on your specific output configuration.
The Combined Flow
Regardless of the format approach, the end-to-end pipeline looks like this:
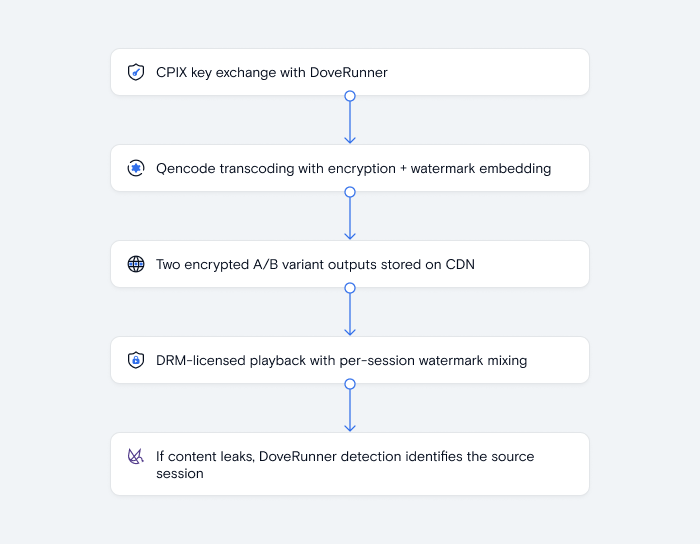
The two protection layers operate independently but reinforce each other. DRM prevents casual unauthorized access. Forensic watermarking deters and traces leaks that circumvent DRM through methods like screen recording or camcording. Together, they form a defense-in-depth strategy for premium content.
7. Security Considerations
Content protection is only as strong as the security of your key material and credentials. Keep the following practices in mind throughout your implementation:
DoveRunner credentials (site_key, access_key) must remain server-side. The only DRM artifact that should ever reach a client device is the license token, a short-lived, scoped authorization string. Never include site_key or access_key in client-side code, mobile app bundles, or browser JavaScript.
KMS tokens are secrets. Your KMS token grants access to the CPIX key exchange API. Treat it with the same care as a database password: store it in environment variables or a secrets manager, do not commit it to version control, and rotate it per your organization’s key management policy.
Encryption keys are sensitive material. The key, key_id, and iv values extracted from the CPIX response transit from DoveRunner to your backend to the Qencode transcoding job. These values should not be logged in plaintext, stored in databases beyond what is needed for job submission, or exposed in API responses.
License tokens expire after 10 minutes. Generate a fresh token for every playback session. Do not cache tokens or reuse them across sessions or users, a compromised cached token could authorize unauthorized playback until it naturally expires.
Watermarking credentials. The doverunner_wm_key and doverunner_access_key are used during the encoding pipeline and should be managed with the same care as other service credentials. They do not need to reach client devices.
8. Troubleshooting Common Issues
Playback fails with a license error
Most likely cause: The content_id used in Step 1 (CPIX key exchange) does not exactly match the content_id used in Step 3 (license token generation). These must be identical strings. Double-check both values, including casing, whitespace, and any trailing characters.
Base64-to-hex conversion produces unexpected values
Verify your conversion step by step:
- Confirm you are decoding the correct base64 string (the
pskc:PlainValueforkey, theexplicitIVattribute foriv). - Check that you are not accidentally including surrounding whitespace or XML tags in the base64 string.
- After decoding, confirm the byte length is 16 bytes (which produces 32 hex characters). If not, the input base64 string is likely incorrect.
Forensic watermarking job returns a validation error
Check these three constraints, in order:
- Your job must specify
"encoder_version": 2. The v1 encoder does not support forensic watermarking. - The output format must be
"advanced_hls". Other formats are not supported. - The video codec must be H.264 (
libx264). Other codecs are not currently supported for watermarking.
Token expired error at playback time
DoveRunner license tokens are valid for 10 minutes from generation. If there is significant latency between generating the token on your backend and the player actually sending the license request (due to buffering, network issues, or user interaction delays), the token may expire. Regenerate the token closer to the actual playback initiation.
Only one watermark variant appears in output
Check the job status response for wm_symbol fields across all outputs. Both wm_symbol: 0 and wm_symbol: 1 should be present. Verify that both /0/ and /1/ directories exist in your storage destination. If only one variant was produced, confirm that the forensic_watermark credentials are valid and that the job did not encounter an error during encoding of one variant.
Encrypted content plays back without requesting a license
If the video plays without a license exchange, the content may not have been encrypted. Confirm that your Qencode job included the cenc_drm block and completed without errors. Inspect the .mpd manifest, it should contain PSSH and ContentProtection elements.
9. Reference Appendix
API Endpoints
| Service | Endpoint | Purpose |
| Qencode | POST https://api.qencode.com/v1/access_token | Obtain a session token |
| Qencode | Job submission endpoint (see Qencode API docs) | Submit transcoding jobs |
| DoveRunner | POST https://drm-kms.doverunner.com/v2/cpix/doverunner/getKey/{kms-token} | CPIX key exchange |
| DoveRunner | https://drm-license.doverunner.com/ri/licenseManager.do | DRM license server (Widevine, PlayReady and Fairplay) |
Example Scripts
Three example scripts are available that implement the workflows described in this guide:
- CPIX key exchange + Qencode DRM encoding — A Python script that calls the DoveRunner CPIX API, extracts and converts the encryption material, and launches a Qencode job with Widevine CENC encryption. Linked from the Qencode DoveRunner DRM tutorial.
- DoveRunner license token generation — A Python script using the
python-pallyconSDK to generate a license token for playback authorization. - Forensic watermarking job (
doverunner_forensic_watermark.py) — A Python script from the Qencode Python 3 SDK that launches a Qencode transcoding job with DoveRunner forensic watermarking. Demonstrated live during the webinar.
Further Reading
- DoveRunner Forensic Watermarking Documentation — Full watermarking service documentation.
- DoveRunner Watermark Embedding Guide — CDN-side session mixing for A/B variant delivery.
- DoveRunner Watermark Detection API — API for analyzing leaked content and recovering viewer session identifiers.
- DoveRunner Getting Started Guide — Account setup and initial configuration.
- TagMango Case Study — How TagMango built a creator-first video platform using Qencode and DoveRunner. Referenced during the webinar closing.
Co-authored by the teams at Qencode and DoveRunner

